How to Easily Synchronize your Configuration with Visual Studio Code?


If you frequently change devices on which you work or there are many people in your team, you've probably uploaded configuration files or manually set the editor to keep the coding style. Here, you will learn how to improve the configuration game.
I am a Visual Studio Code user and I mostly work on React projects, so the post will be from a React project perspective but is applicable to all projects.
Why is configuration synchronization important?
For some, it is obvious, and for others, the need to synchronize the configuration may be surprising. Appropriate configuration of the project and editor speeds up the work and the implementation of new people in the team. It also allows for cleaner commits to the repository. Why does it allow cleaner commits? It's simple - many projects use different formatters, such as Prettier. If the editor’s configuration is incorrect, different formatters or their configurations can be used, and thus the commit will contain changes that affect style.
Visual Studio Code
Editor developed by Microsoft, available for Windows, Mac, Linux and even on GitHub. According to a survey conducted by StackOverflow in 2022 - VSCode is the most popular editor, leaving the competition behind. I guess this is true because most people that I know use VSCode.
Project scope configuration
Visual Studio Code allows configuration at the editor and project level. Settings at the project level override those that are global. This is useful when a project requires some specific settings or to configure extensions. Project scoped configuration is located in the .vscode folder, this folder can contain settings.json file, extensions.json file and files for custom snippets.
Settings.json
The settings.json file can contain the same settings as for the editor, and just like for the editor, this file can be edited manually or with the usage of the GUI.
Configuration via GUI:
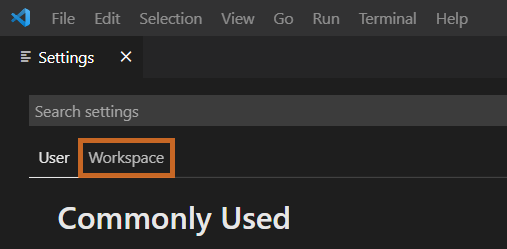
- Open your project in VSC and go to settings:
- Windows/Linux:
File > Preferences > Settings - Mac:
Code > Preferences > Settings
- Select the Workspace tab:

- Start configuring your project.
Manual configuration:
- In the project's root directory, create a
.vscodefolder, if it does not exist. - In that directory, create a file named
settings.json. - It is a JSON file, so for the configuration to be correct, you need to stick to this notation, example of the file:
{
  "editor.formatOnSave": true,
  "editor.tabSize": 2,
  "[typescript]": {
    "editor.defaultFormatter": "esbenp.prettier-vscode"
  }
}
PS VSCode suggests what can be configured with autocomplete.
Extensions.json
There are two sections in the extensions.json file, one for recommended extensions and the other for listing unwanted extensions. The file can be created via the interface, but the file can only be edited manually.
Creating the file via GUI:
- Open your project in VSC and open the command palette:
- Windows/Linux:
Ctrl + Shift + P - Mac:
Cmd + Shift + P
- Search for “Configure recommended extensions” and confirm selection

- A file
extensions.jsonshould be created in the.vscodefolder with the default content.
Content of the file:
The file consists of two lists: recommendations and unwantedRecommendations, the purpose of these two lists is what the names suggest. The entry in the list consists of the author's name and the extension separated by a period, for example: esbenp.prettier-vscode. However, we do not need to know the author or the whole name of the extension, after pressing the hotkey responsible for autocomplete, a list of possible inputs will appear. File example:
{
  "recommendations": ["esbenp.prettier-vscode"],
  "unwantedRecommendations": ["HookyQR.beautify"]
}
Settings Sync
This function is useful when we often change the device on which we work. In Visual Studio Code, the Settings Sync option allows you to sync settings between devices. Unfortunately, this option requires a GitHub or Microsoft account.
This functionality allows you to synchronize:
- Settings,
- Keyboard shortcuts,
- Tasks,
- Snippets,
- Extensions,
- State of the interface.
To activate this option:
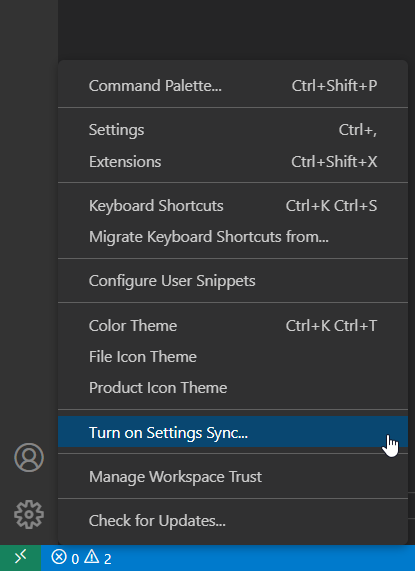
- Click on the gear on the sidebar and select Turn on Settings Sync...

- A window will appear in place of the command palette, select which options you are interested in and log in to your GitHub or Microsoft account

EditorConfig
Visual Studio Code allows you to synchronize configurations between developers and devices, but not everyone uses the same editor. This is where EditorConfig comes in handy, allowing you to maintain a consistent coding style - regardless of the editor and programming language.
Why should I use EditorConfig?
You might be wondering why I should use EditorConfig since there are fomatters. The difference is that formatters ensure that code is styled only after it has been written, and using EC allows formatting as you type. Some people say that it is unnecessary and that the formatter is enough. Well, it all depends on you and your team. In my opinion, this is something worth adding to the project.
Installation
EditorConfig is a solution that does not require you to use a specific language - it supports all of them. Some editors integrate with EditorConfig out of the box, such as most IDEs from JetBrains, but some editors require an extension, such as VSCode.
Usage
To start your adventure with EditorConfig, create a file called .editorconfig in your project directory. In the examples below, I will describe how to fill in such a file.
root = trueIt is possible to create multiple files for one project. EditorConfig searches the project from the location of the edited file until it finds the file .editorconfig with the variable root set to true or it reaches the root path.
[*]
charset = utf-8
end_of_line = lf
indent_size = 2
In square brackets, there is the name of the file to which the options below apply. * is a wildcard, which means that it matches any files. Using wildcard it is possible to select any file with a given extension: * .jsx or many extensions *. {jsx, tsx}.
Each section for a given file name may have several options that are responsible for the file formatting. You will find them here.
Summary
The perfect solution that allows you to configure each editor after cloning a repository does not exist. Adding configuration for individual editors and using EditorConfig allows you to simplify and speed up the entire process. I recommend adding EditorConfig for consistent styles and a configuration for editors that contains the configuration of extensions, including formatter, thanks to which we will avoid unnecessary changes in the code. Another way is to drop any configurations and use Husky, which allows you to use git hooks for formatting and linting your code during commits.
Need experts who know how to choose and use the right tech?
Related posts
Dive deeper into this topic with these related posts
You might also like
Discover more content from this category
Storing data as an array type is not as popular as for example creating another table with the association.


