Push Notifications and Web Sockets in React Native


React Native has become a popular platform for developing mobile apps due to its versatility and ability to create native apps for both Android and iOS platforms using a single codebase.
In this article, we will be exploring and setting up two essential technologies for building engaging and interactive mobile apps - Push Notifications and Web Sockets.
Introduction
Push notifications and Web Sockets are two critical components of modern mobile applications. They enable real-time communication and provide a seamless user experience. React Native, a popular JavaScript framework for building mobile and web applications, provides support for these technologies through a variety of APIs and libraries. In this article, we will dig into the concepts of Push Notifications and Web Sockets and explore how they can be implemented in React Native to create robust and responsive mobile applications.
More information about Push Notification and Web Sockets
Understanding Push Notifications in React Native
Push notifications are short messages that are sent directly to a user's device, regardless of whether the corresponding mobile application is in the foreground, background, or not running at all. Push notifications are an effective way to keep users engaged and informed about updates, events, and other important information in real-time. In React Native, push notifications can be implemented using platform-specific APIs and libraries, such as Firebase Cloud Messaging (FCM) for Android or IOS and Apple Push Notification Service (APNs) only for iOS. Implementing push notifications in React Native requires several steps, including:
- Setting up an account with a push notification service provider, such as FCM or APNs.
- Integrating the push notification service with your React Native application using the appropriate APIs and libraries.
- Implementing the code to handle incoming push notifications, such as displaying an alert or updating the UI.
- Registering the device to receive push notifications by sending a request to the push notification service.
It's also important to keep in mind that push notifications can be customized to meet specific requirements, such as specifying the message content, delivery time, and frequency. Additionally, push notifications can be targeted to specific segments of users, such as those who have opted in to receive certain types of notifications. In conclusion, push notifications are a valuable tool for enhancing user engagement and improving the overall user experience in React Native applications. By following the steps outlined above and leveraging the available APIs and libraries, developers can easily implement push notifications in their React Native projects.
Understanding Web Sockets in React Native
Web Sockets are a powerful communication protocol that enables real-time, bidirectional communication between a client and a server over a single, long-lived connection. Unlike traditional HTTP requests, which are limited to request-response communication, Web Sockets allow for full-duplex communication, enabling both the client and the server to send messages to each other independently at any time.
In React Native, Web Sockets can be implemented using libraries such as socket.io or Web Socket. These libraries provide a simple API for establishing a Web Socket connection and exchanging data between the client and the server.
Implementing Web Sockets in React Native typically involves several steps, including:
- Setting up a server to handle Web Socket connections.
- Installing and integrating the Web Socket library of choice into your React Native application.
- Implementing the code to handle incoming Web Socket messages and sending messages from the client to the server.
- Establishing a Web Socket connection between the client and the server.
Web Sockets are particularly useful for applications that require real-time data transfer, such as chat applications, multiplayer games, and real-time updates and notifications. They also allow for the creation of highly responsive and dynamic user interfaces, as the client and server can exchange data in real-time, without the need for repeated polling.
In conclusion, Web Sockets are a powerful tool for enabling real-time communication in React Native applications. By following the steps outlined above and leveraging the available libraries, developers can easily implement Web Sockets in their React Native projects and create responsive and engaging user experiences.
Comparison of Push Notifications and Web Sockets in React Native
Push Notifications and Web Sockets are both essential components of modern mobile applications, and they both provide a way to communicate with users in real-time. However, there are some key differences between these technologies that are important to understand when deciding which one to use in your React Native application.
Push Notifications are a one-way communication mechanism, allowing the server to send notifications to the client. This makes them ideal for sending alerts, reminders, and other types of updates to the user. Push notifications are also ideal for situations where the client does not need to respond to the server, such as when the user needs to be informed of a new message or update.
Web Sockets, on the other hand, provide a two-way communication mechanism, allowing both the client and the server to send messages to each other in real-time. This makes them ideal for applications that require real-time data transfer, such as chat applications and multiplayer games.
Another important difference between Push Notifications and Web Sockets is the way they are delivered to the user. Push Notifications are delivered directly to the user's device, even if the corresponding mobile application is not running. Web Sockets, on the other hand, require an active connection between the client and the server to exchange messages in real-time.
In terms of implementation, Push Notifications are typically easier to set up and use, as they only require a push notification service provider, such as Firebase Cloud Messaging (FCM), and a few lines of code in the React Native application. Web Sockets, on the other hand, require a server to handle Web Socket connections and a library, such as socket.io or Web Socket, to be integrated into the React Native application.
In conclusion, both Push Notifications and Web Sockets have their own advantages and disadvantages, and the choice between them will depend on the specific requirements of your React Native application. When deciding which technology to use, it's important to consider the type of communication you need to implement, the ease of implementation, and the user experience you want to provide.
Best Practices for using Push Notifications and Web Sockets in React Native
Here are some essential things for best practices in React Native for Push Notifications and Web Sockets.
- Push Notifications:
- Ask for user permission before sending notifications.
- Use meaningful and relevant notification content.
- Offer options for customizing the frequency and type of notifications.
- Implement server-side storage for device tokens to target specific devices.
- Test notifications on multiple devices and platforms to ensure compatibility.
- Web Sockets:
- Use web sockets for real-time, bi-directional communication.
- Implement error handling for broken connections and lost messages.
- Implement server-side storage for active socket connections.
- Consider security measures such as authentication and encryption for sensitive data.
- Optimize the number of messages sent over the socket connection to reduce latency.
By following these best practices, developers can create robust and engaging React Native applications that provide users with real-time updates and information. Implementing push notifications and web sockets efficiently can greatly enhance the user experience of a React Native app.
Initializing React Native Notifications on Android native parts
Initializing React Native Notifications on Android
Now we will move to initializing React Native notifications on Android and using firebase module. This process will require some changes in native parts on an application.
Installation
Install the React Native Firebase "app" module to the root of your React Native project with NPM or Yarn:
# Using npm
npm install --save @react-native-firebase/app

# Using Yarn
yarn add @react-native-firebase/app
Android Setup
To allow the Android app to securely connect to your Firebase project, a configuration file must be downloaded and added to your project.
Generating Android credentials
On the Firebase console, add a new Android application and enter your projects details. The "Android package name" must match your local projects package name which can be found inside of the manifest tag within the /android/app/src/main/AndroidManifest.xml file within your project.

cd android && ./gradlew signingReport. This generates two variant keys. You have to copy both 'SHA1' and 'SHA-256' keys that belong to the 'debugAndroidTest' variant key option. Then, you can add those keys to the 'SHA certificate fingerprints' on your app in Firebase console.
Download the google-services.json file and place it inside of your project at the following location: /android/app/google-services.json.
Configure Firebase with Android credentials
To allow Firebase on Android to use the credentials, the google-services plugin must be enabled on the project. This requires modification to two files in the Android directory.
First, add the google-services plugin as a dependency inside of your /android/build.gradle file:
buildscript {
  dependencies {
    // ... other dependencies
    classpath 'com.google.gms:google-services:4.3.14'
    // Add me --- /\
  }
}
Lastly, execute the plugin by adding the following to your /android/app/build.gradle file:
apply plugin: 'com.android.application'
apply plugin: 'com.google.gms.google-services' // <- Add this line
Initializing React Native Notifications on IOS native parts
On the Firebase console, add a new iOS application and enter your projects details. The "iOS bundle ID" must match your local project bundle ID. The bundle ID can be found within the "General" tab when opening the project with Xcode.

GoogleService-Info.plist file from Firebase Console.
Using Xcode, open the projects /ios/{projectName}.xcodeproj file (or /ios/{projectName}.xcworkspace if using Pods).
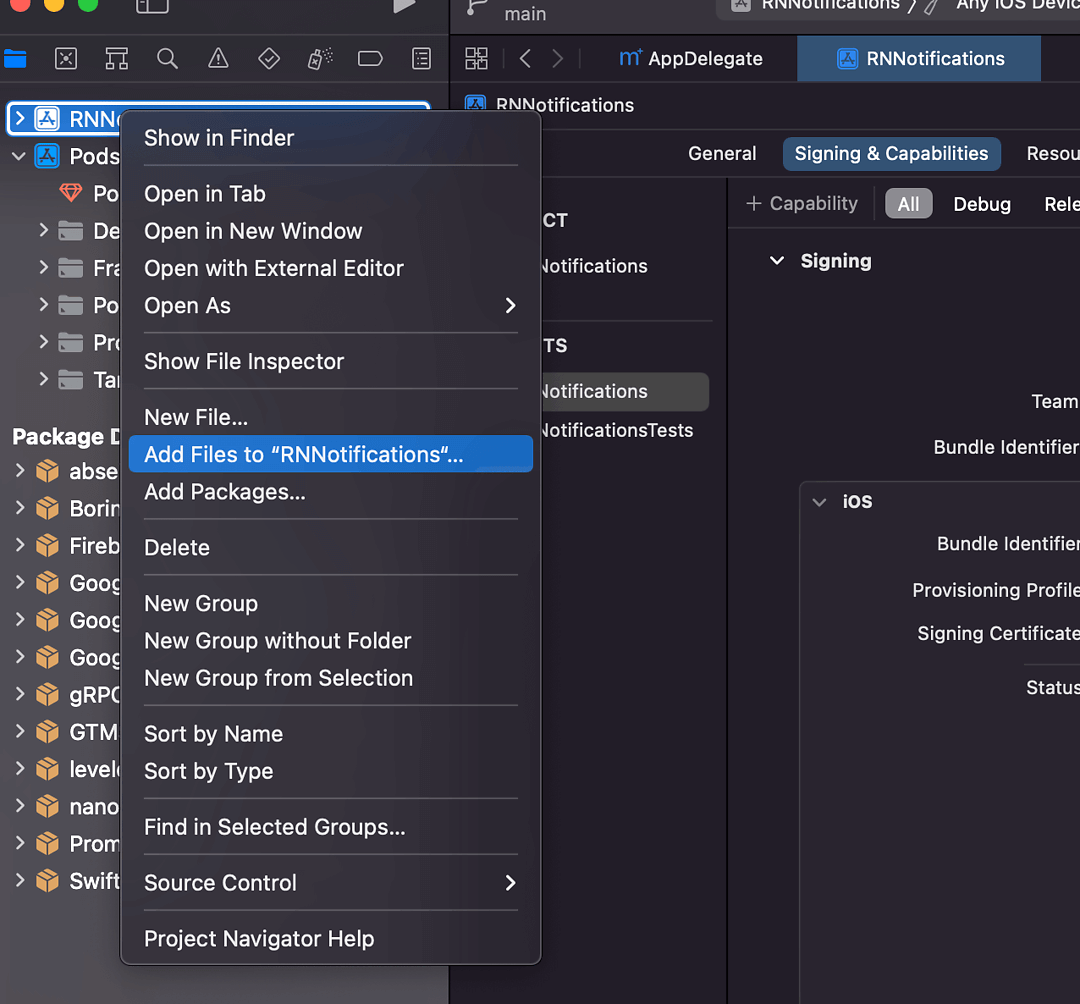
Right click on the project name and "Add files" to the project, as demonstrated below:
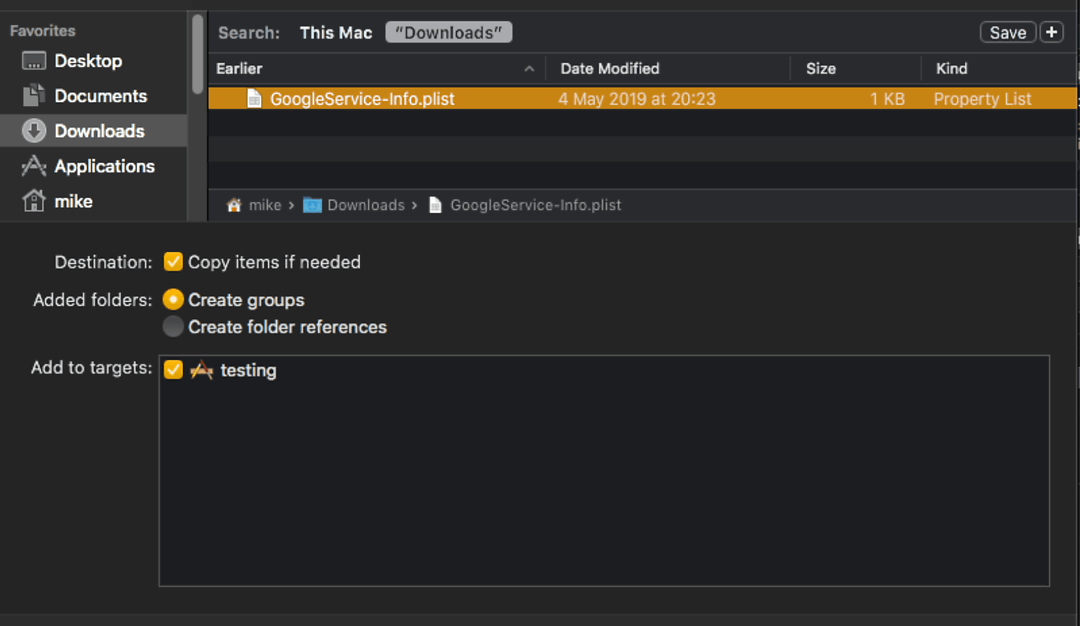
Select the downloaded GoogleService-Info.plist file from your computer, and ensure the "Copy items if needed" checkbox is enabled.
Configure Firebase with iOS credentials
To allow Firebase on iOS to use the credentials, the Firebase iOS SDK must be configured during the bootstrap phase of your application.
To do this, open your /ios/{projectName}/AppDelegate.mm file (or AppDelegate.m if on older React Native), and add the following:
At the top of the file, import the Firebase SDK:
#import <Firebase.h>Within your existing didFinishLaunchingWithOptions method, add the following to the top of the method:
- (BOOL)application:(UIApplication *)application didFinishLaunchingWithOptions:(NSDictionary *)launchOptions {
  // Add me --- \/
  [FIRApp configure];
  // Add me --- /\
  // ...
}
Altering CocoaPods to use frameworks
Beginning with firebase-ios-sdk v9+ (react-native-firebase v15+) you must instruct CocoaPods to use frameworks.
Open the file ./ios/Podfile and add this line inside your targets:
use_frameworks!Notes: React-Native-Firebase uses use_frameworks, which has compatibility issues with Flipper, Hermes & Fabric.
Flipper: use_frameworks is _not_ compatible with Flipper. You need to disable Flipper by commenting out the :flipper_configuration line in your Podfile.
Hermes: a fix was put in place in react-native release 0.69.1 that allows Hermes to work with use_frameworks!. To use use_frameworks with Hermes, make sure you have set static linkage with use_frameworks! :linkage => :static.
New Architecture: Fabric is not compatible with use_frameworks!. Community support to help fix use_frameworks support for New Architecture is welcome!
It may also require to use:
use_modular_headers!To use Static Frameworks on iOS, you also need to manually enable this for the project with the following global to the top of your /ios/Podfile file:
$RNFirebaseAsStaticFramework = true;Push Notifications in React Native app - JavaScript code
Now if we have everything set up properly in navite parts, we can move to JavaScript code. We will need four steps. In example application those steps were put on the top App.tsx file in the useEffect hook like this:
useEffect(() => {
  getPerrmissions();
  initializeApp();
  subscribeToTopic();
  createNotificationListeners();
}, []);
As a first step in our React Native app we need to get necessery permissions for both Androi and IOS. We will need those imports for this:
import { PermissionsAndroid, Platform } from "react-native";
import messaging from "@react-native-firebase/messaging";
This part will be platform dependent:
const getPerrmissions = () => {
  if (Platform.OS === "android") {
    requestUserPermissionAndroid();
  } else {
    requestUserPermissionIOS();
  }
};
Where requestUserPermisionAndroid is:
const requestUserPermissionAndroid = async () => {
  PermissionsAndroid.request(PermissionsAndroid.PERMISSIONS.POST_NOTIFICATIONS);
};
and requestUserPermissionIOS:
const requestUserPermissionIOS = async () => {
  const authStatus = await messaging().requestPermission();
  const enabled =
    authStatus === messaging.AuthorizationStatus.AUTHORIZED ||
    authStatus === messaging.AuthorizationStatus.PROVISIONAL;

  if (enabled) {
    console.log(authStatus);
  }
};
As a second step we need to initialize firebase app. We will need firebase module:
import firebase from "@react-native-firebase/app";The firebaseConfig object you use to initialize Firebase in your React Native app needs to contain the following properties:
const firebaseConfig = {
  apiKey: "your-api-key",
  authDomain: "your-auth-domain.firebaseapp.com",
  databaseURL: "https://your-database-url.firebaseio.com",
  projectId: "your-project-id",
  storageBucket: "your-storage-bucket.appspot.com",
  messagingSenderId: "your-messaging-sender-id",
  appId: "your-app-id",
};
These properties are obtained from the Firebase Console when you create a new project.
apiKey: Your Firebase API key, which is used to authenticate API requests.authDomain: The domain used for Firebase authentication.databaseURL: The URL of your Firebase Realtime Database.projectId: The unique identifier for your Firebase project.storageBucket: The default Firebase Storage bucket.messagingSenderId: The ID of the sender that is used to send messages through FCM (Firebase Cloud Messaging).appId: The unique identifier for your Firebase app.
You'll need to replace the placeholder values in the firebaseConfig object with the actual values for your Firebase project.
For initialization firebase app we can use method initializeApp(firebaseConfig) from firebase module like this:
const initializeApp = async () => {
  try {
    await firebase.initializeApp(firebaseConfig);
  } catch (err) {
    console.log(err);
  }
};
After this step we should be able to sent Push Notification to our device from Firebase console. We can do this from Messaging section like that:
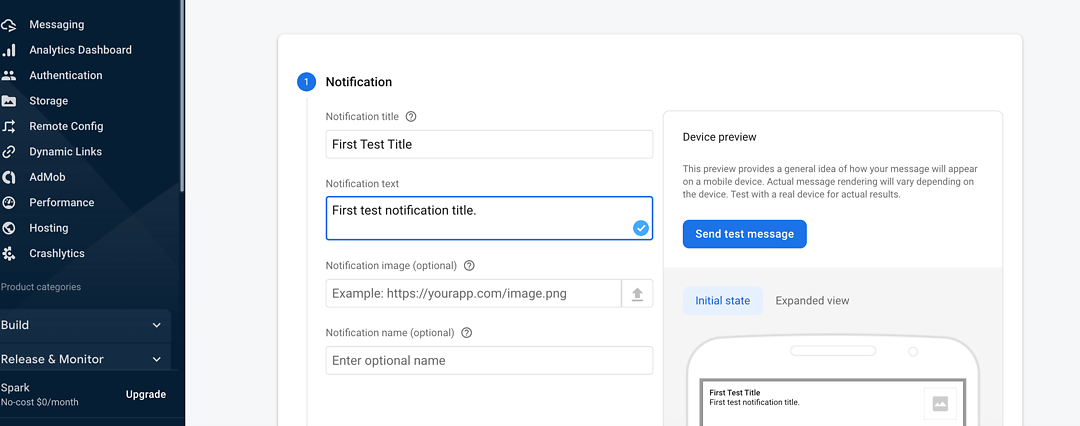
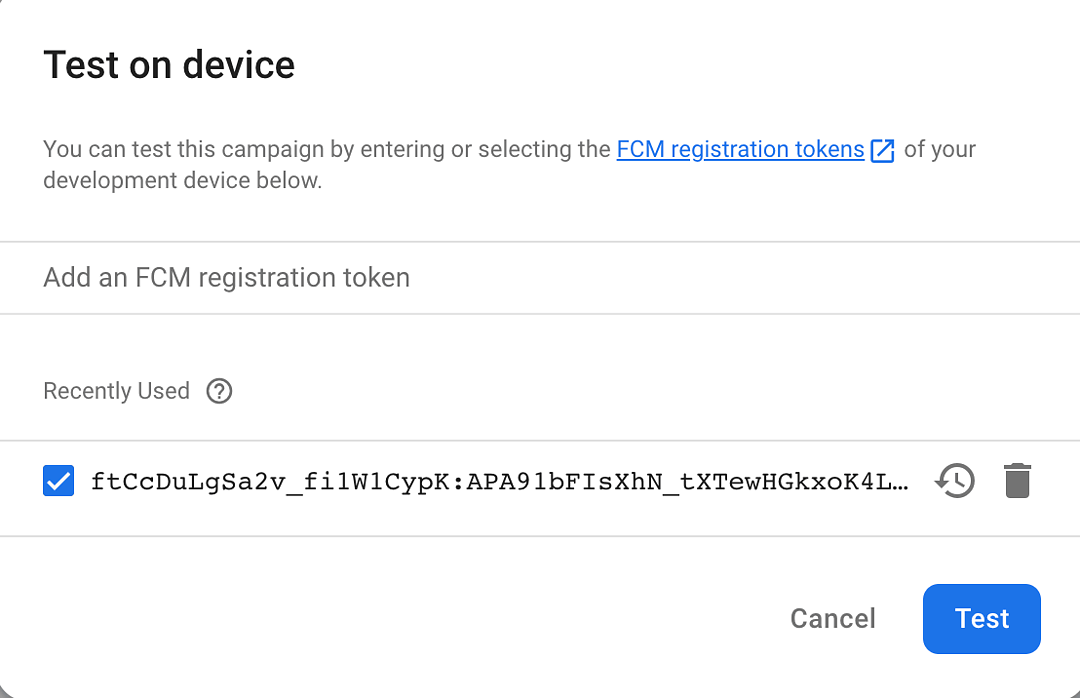
After typing 'Send test message' we will still need to add FCM registration token in the next window. We get our token using messaging().getToken(). It can be used like that:
useEffect(() => {
  messaging()
    .getToken()
    .then((token) => {
      console.log("Your token is: ", token);
    });
}, []);
Then we can add our token and send notification to our device.
Subscribing to the topic
For receiving notifications from our server we will need to subscribe to certain topic. A topic is simply a string that identifies a group of devices that have expressed an interest in receiving notifications on a particular subject. When you publish a message to a topic, FCM will deliver the message to all devices that have subscribed to that topic.
To subscribe a device to a topic, you can use the firebase.messaging().subscribeToTopic method in your app. For example:
import firebase from "@react-native-firebase/app";
import messaging from "@react-native-firebase/messaging";

async function subscribeToTopic(topic) {
  try {
    await messaging().subscribeToTopic(topic);
    console.log(`Subscribed to topic: ${topic}`);
  } catch (error) {
    console.error(`Error subscribing to topic: ${error}`);
  }
}

// Example usage:
subscribeToTopic("weather");
Keep in mind that devices can also unsubscribe from topics if they no longer wish to receive notifications on that topic. You can use the firebase.messaging().unsubscribeFromTopic method to handle unsubscribing.
Creating listeners
Now we have everything we need to receive notifications both from firebase console and from our server, but we still don't have access to data in our JavaScript code. We will need messaging firebase module for that:
import messaging from "@react-native-firebase/messaging";In React Native, you can create separate notification listeners for different types of notifications, such as foreground notifications, background notifications, and data-only notifications.
Here's an example of how you might set up separate listeners for foreground and background notifications:
// Foreground notification listener
messaging().onNotificationOpenedApp((remoteMessage) => {
  console.log("Notification opened app:", remoteMessage);
});

// Background notification listener
messaging().setBackgroundMessageHandler(async (remoteMessage) => {
  console.log("Message handled in the background!", remoteMessage);
});
In this example, the onNotificationOpenedApp method listens for notifications that are received when the app is in the foreground, and the setBackgroundMessageHandler method listens for notifications that are received when the app is in the background.
For foreground notifications, you can access the data payload of the incoming notification via the remoteMessage object that is passed to the onNotificationOpenedApp callback. For background notifications, you can access the data payload of the incoming notification via the remoteMessage object that is passed to the setBackgroundMessageHandler callback.
For data-only notifications, which contain only data and no notification payload, you can listen for incoming data messages using the onMessage method:
messaging().onMessage(async (remoteMessage) => {
  console.log("Data message received:", remoteMessage);
});
The getInitialNotification method in React Native Firebase can be used to retrieve the initial notification that was received by the app when it was opened. This can be useful if you want to handle specific actions based on the notification that the user tapped on to open the app.
Here's an example of how you might use the getInitialNotification method in your React Native app:
messaging()
  .getInitialNotification()
  .then((remoteMessage) => {
    if (remoteMessage) {
      console.log(
        "Notification caused app to open from quit state:",
        remoteMessage.notification
      );
    }
  });
In test application we packed our listeners together in one function like this:
const createNotificationListeners = async () => {
  messaging().onNotificationOpenedApp((remoteMessage) => {
    console.log(
      "Notification caused app to open from background state:",
      remoteMessage.notification
    );
  });

  messaging().setBackgroundMessageHandler((remoteMessage): any => {
    console.log(
      "Notification got in the background mode:",
      remoteMessage.notification
    );
  });

  messaging().onMessage((remoteMessage) => {
    if (remoteMessage) {
      console.log("Notification data message:", remoteMessage.notification);
    }
  });

  messaging()
    .getInitialNotification()
    .then((remoteMessage) => {
      if (remoteMessage) {
        console.log(
          "Notification caused app to open from quit state:",
          remoteMessage.notification
        );
      }
    });
};
and we called it in App.tsx useEffect.
That should be everything we need to get and use our Push Notification both from Firebase Console and our server.
Initializing Web Sockets on React Native app
For making Web Socket connection we used the phoenix package check here. Phoenix is our technology of choice at Curiosum for building web severs (learn why here). This framework is built on Elixir, a high-performance language that runs on the Erlang virtual machine. Elixir's built-in concurrency and fault tolerance features make it an excellent choice for server development, while its clean syntax and robust tooling help developers write scalable and maintainable code. Following part will show how to make Web Socket connection with this server, but analogies to others can be found. The example app with implemented Push Notifications and Web Socket using phoenix package can be found here.
Before we start, we will need to install phoenix package.
npm install phoenix
or
yarn add phoenix
For establishing Web Socket connection we will need few things:
Socket Context in which we will store our Socket and put it into provider.
import React, { useEffect, useState } from "react";
import { Socket } from "phoenix";

// @ts-ignore
export const SocketContext = React.createContext();

interface SocketProviderProps {
  children: JSX.Element;
  options: Record<string, any>;
  url: string;
}

export const SocketProvider = ({
  children,
  options,
  url,
}: SocketProviderProps) => {
  const [socket, setSocket] = (useState < Socket) | (null > null);

  useEffect(() => {
    const s = new Socket(url, options);
    s.connect();
    setSocket(s);

    return () => {
      s.disconnect();
      setSocket(null);
    };
  }, [options, url]);

  const props = {
    value: {
      socket,
    },
  };

  return React.createElement(SocketContext.Provider, props, children);
};
Our app has to be wrapped inside this provider. It can be done like that:
<SocketProvider url={HOST + "/socket"} options={{}}>
  <SafeAreaView style={styles.container}>
    <Text style={styles.header}>React Native Notifications test</Text>
    <TouchableOpacity style={styles.button}>
      <Text style={styles.buttonText}>RNFIREBASE BUTTON 1</Text>
    </TouchableOpacity>
    <WSDisplay />
  </SafeAreaView>
</SocketProvider>
Where 'HOST' constant is our server address, and inside 'SocketProvider' we will have our app content.
If we have our Socket inside our global context, now we can establish channel.
Phoenix channels are a key feature of the Phoenix framework that allow real-time, bi-directional communication between a client and a server over a web socket connection. They are used to build real-time applications, such as chat apps, collaborative document editors, and real-time games.
In React Native, Phoenix channels can be used to receive real-time updates from the server and display them in the app, or to send updates from the app to the server for broadcast to other connected clients. Here we have our hook we use to set up a channel.
import {SocketContext} from '../context/socketContext';
import {Context, useContext, useRef, useState} from 'react';
import {decamelizeKeys} from 'humps';
import {useDeepCompareEffect} from 'ahooks';
import {Channel, Push, Socket} from 'phoenix';

export const useChannel = (
  topic: string,
  params: Record<string, any>,
  onJoin: Function,
  onClose = () => {},
) => {
  const {socket} = useContext<{socket: Socket}>(
    SocketContext as Context<{socket: Socket}>,
  );
  const [channel, setChannel] = useState<Channel | null>(null);

  const onJoinFun = useRef(onJoin);
  onJoinFun.current = onJoin;

  useDeepCompareEffect(() => {
    if (socket === null) {
      return;
    }
    const ch = socket.channel(topic, params);
    ch.join().receive('ok', message => {
      onJoinFun.current(ch, message);
    });
    setChannel(ch);

    ch.onClose(onClose);

    return () => {
      ch.leave();
      setChannel(null);
    };
  }, [socket, topic, params]);

  return channel;
}
In the example above for setting up channel, we used 'useDeepCompareEffect' hook instead of normal 'useEffect' hook because 'topic' and 'params' in its dependency are not react states. This way of checking is more deep. In the test app we used our server topic which was 'weather:lobby' and no params.
When we have our channel set up we can now write Event Handler:
import { camelizeKeys } from "humps";
import { Channel } from "phoenix";
import { useEffect, useRef } from "react";

export const useEventHandler = (
  channel: Channel | null,
  event: string,
  handler: Function
) => {
  const handlerFun = useRef(handler);
  handlerFun.current = handler;

  useEffect(() => {
    if (channel === null) {
      return;
    }

    const ref = channel.on(event, (message) => {
      handlerFun.current(camelizeKeys(message));
    });

    return () => {
      channel.off(event, ref);
    };
  }, [channel, event]);
};
So now we can turn on our channel on a specific event. In test app this is 'current_weather', but it depends on server. Camelizing keys is optional. Our Socket message should be assigned to our 'handlerFun' reference.
In the test app there is example usage of socket data used in the 'WSDisplay' component, but from this place it can be used however it needs to be.
import { View, Text } from 'react-native';
import { useState } from 'react';
import { useChannel } from '../hooks/useChannel';
import { useEventHandler } from '../hooks/useEventHandler';

export const WSDisplay = (): JSX.Element => {
    const [wsMessage, setWSMessage] = useState<any>()
    const channel = useChannel('weather:lobby', {}, () => {})
    useEventHandler(channel, 'current_weather', (data: any) => {
      const response = JSON.parse(data)
      setWSMessage(response.data.base)
    })

    return (
        <View>
          <Text>WSMessage: {wsMessage}</Text>
       </View>
    )
}
This should be enough! This example should allow to receive some data from server through Web Socket on channel 'weather:lobby', event 'current_weather'.
Conclusions
In conclusion, push notifications and web sockets play a crucial role in modern mobile applications. By providing real-time updates and information to users, even when the app is not in use, they enhance the overall user experience. In this article, we discussed some best practices for implementing push notifications and web sockets in React Native applications. These best practices include asking for user permission, using meaningful content, implementing error handling, considering security measures, and optimizing message frequency.
By following these best practices, developers can ensure that their push notifications and web socket implementations are efficient, user-friendly, and secure. The combination of push notifications and web sockets can greatly enhance the user experience of a React Native app, making it more dynamic and engaging. As mobile technology continues to evolve, it will be important for developers to stay up-to-date on the latest best practices for push notifications and web sockets in React Native.
Want a stunning mobile app built with React Native?
Related posts
Dive deeper into this topic with these related posts
You might also like
Discover more content from this category
Cross-platform mobile development involves creating mobile apps that run on various platforms using a single codebase.
Mobile app development has been on the rise in recent years, with more and more businesses and developers recognizing the importance of having a presence on mobile devices.
Mobile Push notifications are a feature of modern mobile systems that allow applications to notify users of new messages, updates, or other information, even when the user is not actively using the app.


